Experience Trading
on the Go
on the Go
1. Placing trades using the Mini Terminal
1.1 Placing buy/sell orders
Once the Mini Terminal is running you can place buy and sell orders using the large buy and sell
buttons:
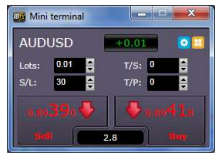
MT4/5 will show its usual dotted horizontal lines on the chart for each order. The status indicator at the top of the Mini Terminal will show your current net position, e.g. +0.10 if you are long 0.1 lots, or -0.10 if you are short 0.1 lots.
You can control the lot size on new orders, and set a stop-loss, take-profit, or trailing-stop using the fields above the buy and sell buttons.
1.1.1 Calculators
You can open calculators for each of the order fields – the volume, s/l, t/p, and trailing stop – by holding down the Ctrl key while clicking on them. For example, if you are trading 0.25 lots, and you want a stop-loss which is equivalent to $100, then you can Ctrl+click on the S/L field and tell the calculator to work out the number of pips which is equivalent to a fixed cash risk of $100.
1.2 Placing pending orders
You can place pending orders (limits and stops) by clicking on the ![]() button. You can choose the order type and entry price, stop-loss,
take-profit etc.
button. You can choose the order type and entry price, stop-loss,
take-profit etc.
The entry price for pending orders can be defined either as a fixed price (e.g. 1.23456) or as a number of pips. For example, if you choose a buy-limit and enter a value of 20 pips rather than a price, then the limit order is created 20 pips below the current price.
1.2.1 Placing pending orders directly from the chart
You can also create pending orders from the chart. If you hold down the Ctrl key while clicking on
the chart, a small window will pop up letting you create a pending order at the selected price. If
the price you click on is above the current price then you can create a buystop or a sell-limit; if
the selected price is below the current price then you can create a buylimit or a sell-stop. Using
the MT4/5 cross-hairs to do this (use the![]() button on
MT4/5’s toolbar) will help to identify the exact price you are selecting.
button on
MT4/5’s toolbar) will help to identify the exact price you are selecting.
1.2.2 OCO orders
You will find these by clicking on the ![]() button and
selecting OCO (one-cancels-other) from the drop down ‘Order type’ menu. There are two types of OCO
order:
button and
selecting OCO (one-cancels-other) from the drop down ‘Order type’ menu. There are two types of OCO
order:
• “OCO breakout”. You specify two prices, or two values in pips, either side of the current price,
and the Mini Terminal places a buy-stop and a sell-stop. Once one of the pending orders is filled,
the other is automatically cancelled. You would typically use this when you are expecting a major
price movement, but you don’t know whether the move is going to be up or down. For example, there
are many trading strategies based around trading the breakout, in either direction, of yesterday’s
range.
• “OCO reversion”. In this case the Mini Terminal places a buy-limit and sell-limit,
rather than a buy-stop and sell-stop. You would typically use this if you are expecting a move in
either direction followed by a return towards the current price – e.g. a bounce off yesterday’s high
or low.
1.3 Order templates
If there is a type of order which you place regularly – e.g. a buy-limit 20 pips below the current price, with a 100-pip s/l and t/p – then you can save this as a template for quick re-use in future:
• Click on the![]() button
button
• Enter the details of the order on the ‘New order’ screen
• Click on the “Save
template” button and choose a name.
You can then quickly execute that saved template in future:
• Hold down the Ctrl key while clicking on the![]() button
button
• Choose the saved template from the list; your order will be automatically implemented
1.4 Closing orders
You can close an open position by clicking on the position marker at the top of the Mini Terminal: the text which reads +0.10, -0.50 etc. This will slide out a panel of options:
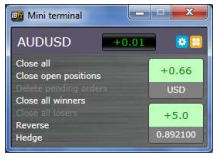
The panel shows the profitability of order for the symbol in cash terms, and also in pips. The price underneath the profit in pips is the average entry price for the position (if there is more than one open order).
You can use the options to close all open orders for the symbol, or all winning or losing trades,
or to hedge or reverse the open position.
1.5 Modifying orders
By default, the Mini Terminal will show markers on the chart for each order. (You can turn off
these markers, or change their position, using the Settings.)
You can click on the markers to
open a pop-up window for each order, and you can use the “handle” at the right-hand end of the
marker to drag it.
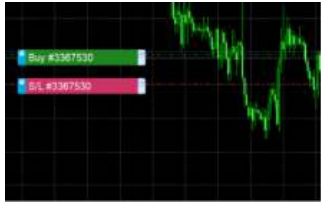
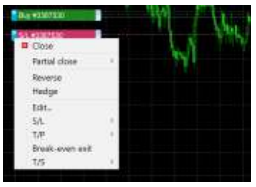
You can also click on the settings icon at the left of the marker to display a menu for editing the order or position.
1.5.1 Changing s/l, t/p and pending entry prices by dragging markers
You can change the s/l or the t/p of an order by dragging its marker, using the “handle” at the
right-hand end of the marker. You can also drag the entry price of pending orders (but you cannot
move the entry price of open positions!)
If you drag a marker to an invalid level – e.g. you drag a s/l the other side of the current
market price – then you will be asked if you want to close the order. You can cancel a drag which is
in progress by pressing the Esc key.
1.5.2 Viewing and changing order details
You can open a pop-up window for each order by clicking on its chart marker. The window shows how
close the s/l and t/p are to being hit (e.g. for long orders, the distance from the current bid
price to the s/l), and the cash effect on the balance if the s/l or t/p is hit.
The current profit for the order shown in the top-right of the window can be switched between
cash and pips by clicking on it.
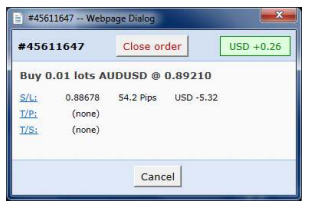
You can close the order using the red button, and you can change the s/l, t/p or trailing stop by clicking on those options.
1.5.3 Changing the s/l or t/p on all open orders
You can also change the s/l or t/p on all open orders by clicking on the chart. You move the mouse over the price where you want to set the s/l or t/p (it is easier using the MT4/5 crosshairs), and then hold down the Ctrl key while clicking – i.e. the same method as for placing a pending order.
From the window which pops up, you then click on the s/l or t/p buttons and the s/l or t/p will automatically move to the new price selected. For example, you can Ctrl+click on the high or low of a bar to set the s/l or t/p to that price or use the cross hairs or mouse cursor to select a new price.
1.6 Other features
1.6.1 Settings, and non-hedging mode
You can control the settings used by the Mini Terminal by clicking on the Tools button ( ![]() ) and
choosing “Settings”. This lets you turn on confirmations before orders are opened and closed, and
also lets you turn on non-hedging mode.
) and
choosing “Settings”. This lets you turn on confirmations before orders are opened and closed, and
also lets you turn on non-hedging mode.
By default, the Mini Terminal follows normal MT4/5 behaviour and lets you have buy and sell orders open at the same time. If you turn on non-hedging mode, buy orders close sell orders, and vice versa. For example, if you are long 0.10 lots and place a sell order for 0.30 lots, then the buy order will be closed and a sell order will be placed for the balance of 0.20 lots.
1.6.2 Automated tasks
You can see a list of all the automated tasks which the Mini Terminal is running at any point in
time: any trailing stops on orders, plus any OCO orders. You click on the Tools button (![]() ) and
choose “Auto tasks”.
) and
choose “Auto tasks”.
1.6.3 Undocking the Mini Terminal window
This allows you to trade from multiple monitors at the same time. You can undock the Mini Terminal
into a floating window by clicking on the Tools button (![]() ) and
choosing “Undock terminal”. You can continue to trade while the terminal is undocked from its chart.
To redock the terminal, click on the Tools button again and choose “Re-dock terminal”
) and
choosing “Undock terminal”. You can continue to trade while the terminal is undocked from its chart.
To redock the terminal, click on the Tools button again and choose “Re-dock terminal”
2. Smart Lines
The Smart Lines use line objects drawn on an MT4/5 chart as the stop-loss or take-profit for positions. They provide three main features:
• Trend-line stop-loss (or take-profit)
• Multiple partial stops at different prices (i.e.
partial closes at different price levels)
• Time-based stops (e.g. close all positions at
midnight)
• Order entry from lines on the chart
In the following example there are two converging trend-lines, one for the stop-loss and one for
the take-profit. In addition, there is a time (vertical) line which will close the open position if
the price has not already hit one of the trend lines by then.
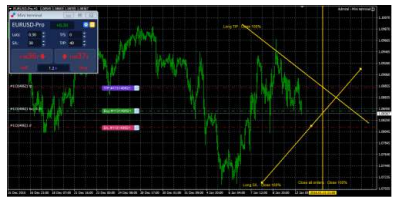
Please note: Smart Lines are processed by your trading software, not by your broker. Smart Lines rules which you create by drawing lines on a chart will be only be applied while your trading software is running.
2.1 Creating a Smart Line
To create a Smart Line you simply do the following:
• Draw a horizontal line, a vertical line, or a trend-line on the chart
• Hold down the Alt
key while clicking on the line
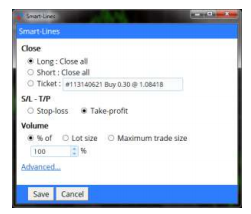
A window such as the following will then pop up, letting you choose what action the line should
take:
2.2 Order entry and order exit
The Smart Lines can be used to close positions, or to open new positions. The pop-up Smart Lines
window has separate tabs for these different types of action.
2.3 Closing positions using Smart Lines
2.3.1 Horizontal lines and trend-lines
Horizontal lines and trend-lines create a price-based stop or take-profit, i.e. an instruction to
close part or all of some positions when the price touches the line.
You can apply horizontal and trend-lines to all buy orders, or to all sell orders, or to any
selection of orders of the same type. (For example, if you have 5 open buy orders and 5 open sell
orders, then you could select any 2 buy orders or any 4 sell orders from the drop-down list, but you
cannot choose a mixture of buys and sells.)
A horizontal line or trend-line must also be either a stop-loss or a take-profit. When you create
the Smart Line, the price must be valid as your selection of stop-loss or take-profit. For example,
if a line is below the current market price then it cannot be used as a take-profit on a buy order.
2.3.2 Vertical lines
Vertical lines create a time-based stop, i.e. an instruction to close part or all of some
positions at a fixed time in the future (regardless of price).
Because they are not price-based, vertical lines can be applied to any selection of orders
without restriction.
2.4 Volume to close
The volume to close when a line is hit can be defined in three ways:
• A percentage of the order/position size
• A fixed amount to close
• A fixed minimum
amount to leave open
2.4.1 Percentage close
A percentage close is applied to the current order/position size. For example, if you have two
lines at different prices which are each set to close 50%, then they will leave 25% of the original
order still open. For example: the order is for 1.00 lots. The first line will close 50% of this,
leaving 0.50 lots. The second line will close 50% of the 0.50, leaving 0.25 lots.
Please note that the Smart Lines always round up, on the basis that it is less risky to be out of
the market than in it. For example: your order/position is 0.50 lots; the line is configured to
close 25%; and the broker’s minimum trade size is 0.10 lots. 25% of 0.50 is 0.125 lots. This will be
rounded up to 0.20 rather than rounded down to 0.10.
2.4.2 Fixed amount to close
Selecting a fixed amount to close simply closes that number of lots, or the current
order/position size if smaller. For example, the line is instructed to close 0.50 lots. If the
order/position is 0.75 lots then 0.50 will be closed, leaving 0.25. If the order/position is 0.10,
then the entire 0.10 will be closed (and no further action will be taken).
2.4.3 Fixed amount to leave open
The fixed amount to leave open is a way of saying “make sure that the order/position is no larger
than X”. For example, the line is instructed to leave 0.20 lots open. If the order/position is 0.10
lots when the line is hit, then no action will be taken. If the order/position were 0.50 lots, then
0.30 lots would be closed, leaving 0.20 lots.
2.4.4 All-orders when closing
If you select one of the all-order options (e.g. all long orders) then the standard behaviour of
the Smart Lines is to apply the amount to close to the total aggregate position.
For example, you have 3 buy orders totaling 1.00 lots, for 0.50, 0.30 and 0.20 lots individually. If
you tell the Smart Lines to close 60% then this will reduce the position size by 0.60 lots overall,
on a FIFO basis. It will close the entire 0.50 order, plus a partial close of 0.10 from the 0.30. It
will not close 60% of each individual order.
You can change this behaviour using the Advanced options, telling the Smart Lines to apply the
rule to each order individually.
2.5 Advanced closure options
2.5.1 Deleting pending orders
By default, the Smart Lines will only process open positions. However, you can use the advanced
options to tell the line to delete pending orders as well. (A partial close of a pending order will
delete the order and re-create a new order for a smaller amount.)
2.5.2 Keeping lines after they are triggered
By default, lines are automatically deleted from the chart after they are triggered (i.e. when
the price or time hits the line). However, you can choose to leave a line in place so that it
continually applies in future, until you remove it manually. You can use this to create a rule such
as “make sure I never have an open position if the price is more than X”.
In order to be able to keep a line, it must have the following three characteristics:
• It cannot be a vertical (time) line – for obvious reasons, this can only apply to horizontal or
trend-lines.
• It must apply to all-orders (or all buy orders etc) rather than to specific
individual tickets.
• The amount to close must be 100%. It cannot be a smaller percentage or a
fixed lot size.
2.5.3 Deleting a line if another line is triggered
You can choose to remove a line automatically if another line is triggered. For example, the
current price is 1.2345, and you have a take-profit line at 1.2400 and a stop-loss line at 1.2300
which are each set to close 50% of your open position.
If you do not set a line to be removed when another line is triggered then the following can
happen:
•Price rises to 1.2400. 50% of the position is closed, e.g. closing 0.30 lots from a position of 0.60 lots.
• Price then falls to 1.2300. A further 50% is closed, reducing the position from 0.30 lots to 0.15 lots.
2.5.4 Closing orders individually
As described above, the default behavior of the Smart Lines is to apply its rules to the
total
aggregate positions when working on all orders, or all buy orders etc. You can change this
behaviour using the advanced settings.
2.6 Filtering the trades to be closed
If you select one of the all-order options, rather than specific individual tickets, then you can
apply filtering to that list. In effect, you are then saying “all orders which meet the following
conditions” rather than just “all orders”.
You can filter on profit, lot size, order comment, and order magic number. For example, by
changing the profit range to -9999999 to 0, you instruct the Smart Lines only to close any losing
positions, and not to touch any winning positions.
The order comment and magic number conditions can be comma-separated lists of values. For
example: 1234,2345,6789 tells the Smart Lines to close orders if their magic number is any out of
1234 or 2345 or 6789. Comment filters must match the start of the MT4/5 order comment, and are not
case-sensitive.
2.7 Using Smart Lines to open new positions
Smart Lines can be used to open trades as well as close them.
You draw a horizontal line or a trend line on the chart, and then use the “New order” tab of the
Smart Lines window to define whether the line should be a buy or a sell order, and to specify the
volume to trade.
3. Order ladders
By default the Mini Terminal displays order ladders at the edge of the chart. These can be used to place pending or market orders, as illustrated in the following screenshot:
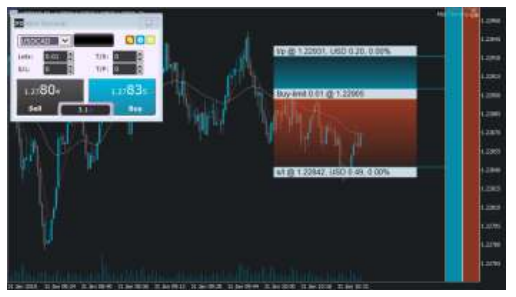
The ladders can be turned off using the settings on the Inputs tab when you add the EA to its chart, or using the options in Maxi mode.
3.1 Buy and sell ladders
The ladder on the left is for buy orders; the ladder on the right is for sell orders. The colour
of the ladders is based on the candle colours which you have chosen for the MT4/5 chart.
As you move the mouse over the ladders, the software draws the corresponding entry price: either
a limit or a stop, depending on whether the line is above or below the current market price.
3.2 Three-click entry from the order ladders
The simplest way of using the ladders is to click three times:
• The first click fixes your entry price: either a limit or a stop, above or below the current
market price
• The second click sets either your stop-loss or your take-profit
• And the third
click sets the other out of the stop-loss and take-profit, and places the order into the market
3.3 Orders with no s/l, or no t/p
You can use a double-click to end an order definition early. For example:
• You click once to fix your entry price
• You then double-click to set your stop-loss. The
order is placed immediately, without needing a third click. The order only has a stop-loss, without
a take-profit. (Alternatively, you can set a take-profit but not a stop-loss.)
This also means that you can simply double-click over the ladders to place a pending limit or
stop order with no take-profit or stop-loss.
3.4 Placing market orders from the ladders
You can use the order ladders to place market orders as well as pending orders.
If you hold down the Shift key while you move the mouse over the ladders, the entry price is set
to the current ask or bid.
• You can then click once to set the stop-loss
• And click a second time to set the
take-profit, after which your buy or sell is placed into the market
You can also combine this with a double-click. For example:
• You hold down the Shift key to place a market order
• You then double-click to set either
your stop-loss or take-profit. The trade is opened immediately, with only a stop-loss or only a
take-profit.
4. “Maxi” mode
The Mini Terminal also has a “maxi” mode, which you can switch into using the “expand” icon![]() . The
Terminal is then docked to the edge of the chart, creating extra space for displaying further
options and features.
. The
Terminal is then docked to the edge of the chart, creating extra space for displaying further
options and features.
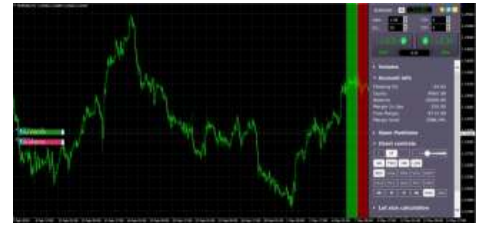
The options and tools are divided up into sections. Each section can be expanded and contracted by clicking on its title, and you can re-order the sections by clicking and dragging on their title bars. In addition, the Mini Terminal’s settings icon lets you hide sections completely from the list.
The sections which are available in maxi mode depend on your type of account. This user guide
describes some of the more common options.
4.1 Chart controls
You can use the chart controls section to make quick changes to the chart: switching it from
candle view to bar view; zooming in and out; and turning features of the chart on and off, such as
grid lines and pivot points.
4.2 Volume buttons
The volume section contains buttons for changing the trading volume in the deal ticket. You can
set your own preferred list of volume options by clicking on the … button and then typing in a list
of volumes which you want this section to display.
4.3 Order list
The order-list section in maxi mode shows you a list of all open orders and trades for the
current symbol. You can modify or close each order using its action icon.
 Access 10,000+ financial instruments
 Auto open & close positions
 News & economic calendar
 Technical indicators & charts
 Many more tools included
By supplying your email you agree to FP Markets privacy policy and receive future marketing materials from FP Markets. You can unsubscribe at any time.
Source - database | Page ID - 984